Description
Ear Otoscope – Ear Light Scope For Ear Wax Cleaning
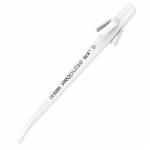
The Ear Otoscope (Ear light Scope) is a must have tool for safely flushing ears. This pen features a bright LED light that shines into the ear canal so the person doing the ear irrigation has good visibility.
The Otoscope pen is small with a portable design. So it easily fits into a pocket or bag to carry around. Made with quality materials, it is durable with long-lasting batteries.
Simple and easy to handle by anyone doing ear procedures. The bright focused beam lighting up the canal makes every step of irrigating out wax safer and avoids any damage deep inside.
Overall an essential device for any clinic or doctor accurately and confidently performing ear irrigation treatment using the precise lighting guidance about where debris remains or blockages exist.
- Otoscope Pen Light for Ear Irrigation
- LED Pen Light
What is the use of otoscope?
An otoscope is a common medical device used for looking at the ear canal, eardrum and middle ear with the use of pen light.
Some common reasons otoscopes help:
- Spotting ear infections. Shining light reveals redness and fluid common in infections to guide medication choices.
- Seeing ear condition. The scope finds injuries likes burst eardrums or irritating scrapes from foreign stuff lodged inside.
- Locating stuck objects. Doctors use it to shine light and find bugs, beads or specs stuck deep causing pain and take them out.
- Checking wax buildup. It helps decide if crusted wax is blocking sound, may cause infection or needs removing.
- Before surgery checks. The light lets crucial checks that structures look normal before fittings of ear tubes or hearing aids.
- Monitoring long-term health. Periodic looks assess recurring eustachian tube issues or abnormal growth over years by comparing side views.
Basically, an otoscope’s focused light and magnified views enable non-invasive peeks at surface and middle ear parts, evaluating function and disease. Super handy for many diagnostic and treatment decisions!
How to Use an Ear Otoscope (Ear Light & Magnifier Tool)
- Put new cover on tip
Attach a fresh, clean cover over the scope tip before putting near ear. - Check light
Turn otoscope light on. Make sure light shines brightly. Replace batteries if dim. - Gently pull outer ear back
Carefully tug top of outer ear up and back. This opens the ear canal best to see inside. - Rest device on cheek as you begin inserting tip
Gently rest hand on face to keep tool steady as initially slide tip just inside canal. Do not forcefully push inside. - Slowly progress deeper through canal
If canal entrance view seems clear, carefully continue advancing deeper bit by bit while gently moving side to side. - Understand what you see
Check canal lining for redness/fluid. Examine eardrum shape. Compare both ears looking for differences. - Use new cover and repeat on other ear
Throw away soiled cover and place fresh one on. Then repeat full steps on other ear.
Always handle the otoscope gently. Rest your hand lightly on the patient’s head to keep the otoscope steady. Immediately stop the exam if the patient feels any pain or dizziness.
Do not insert the speculum tip forcibly at any time. You can join nurses and carers for our ear irrigation training to know more about this process.
Importance of Otoscope
The Ear Otoscope is an important tool for doctors and nurses who do ear cleaning. It has a small light that helps them see inside the ear so they can clean it safely and correctly.
The LED light is bright and clear, so they can see everything they need to without hurting the patient’s ears.
The pen is small and easy to carry, so doctors and nurses can use it in any clinic or hospital. The materials used to make this tool are strong and long-lasting, so it will last a long time.
It is easy to use, and doctors and nurses can rely on it to work well every time. If you are a medical professional, the Otoscope Pen Light for Ear Irrigation is an important tool that you should have.
Who Should Use an Ear Light Scope Device?
An ear light scope device can be used by healthcare professionals, including doctors, nurses, and ear specialists, for examining the ears of patients.
It may also be used by individuals at home for personal use, provided they use it carefully and follow recommended guidelines. We offer practical ear wax removal training in the UK which covers the use of otoscope.
If someone is experiencing ear-related issues or discomfort, having a meeting with a healthcare professional before using such a device at home is advisable.
How do you use an otoscope light?
Here are the key steps to properly use an otoscope to examine the ear:
- Attach a new speculum tip: Place a fresh disposable speculum tip over the beveled end to navigate inside the ear canal comfortably and hygienically.
- Shine light on bright setting
Turn on the attached penlight or otoscope light to high illumination setting. This ensures optimal, clear visualization of the canal lining and eardrum for assessment. - Gently pull outer ear back: Pull the outer ear gently up and back to straighten the ear canal and get a direct line of sight pathway inward.
- Insert into ear opening and along canal
Slowly insert the speculum tip just inside the outer ear canal opening first, then carefully advance deeper through the canal in a slight side to side motion a few millimeters at a time while orienting light to see canal details. - Check condition
Visually inspect and note abnormalities like inflammation, discharge, wax buildup, debris or structural defects while illuminating the canal and eardrum with focused light.
The intense beam should shine directly to light up structures for you to evaluate ear health, guide removal of wax/objects, or assess readiness for tube placement etc.
Stop if light sensitivity or pressure causes discomfort. Proper use requires a very light, cautious touch.
FAQs of Ear Otoscope?
What are the features of an ear otoscope?
An otoscope has several key features:
Light Source: It has a built-in LED light for better visibility in the ear canal.
Magnifying Lens: The device includes a lens to see the ear canal and eardrum more clearly.
Specula Attachments: Different-sized attachments fit various ear canal sizes comfortably.
Disposable Specula: Some models offer disposable specula for hygiene.
Pneumatic Bulb: Some otoscopes check eardrum movement with a pneumatic bulb.
Fiber Optics: Advanced otoscopes use fiber optics for brighter illumination.
Swiveling Head: The head can swivel for better positioning.
Battery or Rechargeable Power: They run on batteries or can be rechargeable.
Adjustable Intensity: Some allow adjusting light intensity for patient comfort.
Ergonomic Design: Many have an ergonomic design for easy handling.
Integrated Insufflator: Some come with an insufflator to deliver air for assessing eardrum function.
Otoscopes vary by model and brand, but they all serve the purpose of detailed ear examination for diagnosis and treatment.
What is an ear otoscope?
An ear otoscope, or simply an otoscope, is a medical instrument used to look inside the ear canal and see the eardrum.
It’s like a tiny flashlight on a stick with a magnifying glass, giving doctors a clear view of your ear’s inner workings.
Can an otoscope see inner ear
No, an otoscope cannot see into or visualise the inner ear. An otoscope is a handheld instrument used to examine the outer ear and eardrum.
Specifically, an otoscope:
- Can examine the external ear canal and outer ear structures for signs of infection, wax buildup, foreign objects, etc.
- Can view the eardrum to diagnose issues like ear infections, perforations, fluid accumulation in the middle ear, and more.
- Often comes with a light, magnification lens, and speculum tips of varying sizes to help appropriately visualise the outer and middle ear anatomy.
However, an otoscope is limited to the external ear canal and eardrum.
It does not have the ability or specialised lenses to see the actual inner ear (cochlea), which is embedded deeper into the dense temporal bone and innervated with nerves and vessels.
To visualise or diagnose issues occurring inside the inner ear, imaging tests like MRI scans or CT scans would be needed.