Basic Life Support Checklist -PDF Download Available
This checklist outlines the essential steps of BLS for adults in a simplified and organised manner. Refer to your full training materials and instructor for detailed explanations and proper technique.
Join our next bls class
Practical Basic Life Support Training
Take Action: book fast as we usually have a small class size for roleplays and practicals.

Key Principles:
- Act Quickly: Early intervention significantly improves survival rates.
- Scene Safety: Ensure it’s safe for yourself and others before approaching a person in distress.
- Chain of Survival: Each step builds upon the previous one, forming a chain of actions that maximise survival chances.
Basic Life Support Steps:
1. Scene Safety (ALWAYS CHECK)
- Before approaching the person, assess the scene for potential dangers such as traffic, fire, or hazardous materials. If unsafe, remove yourself and others from harm’s way and call emergency services.
2. Check Responsiveness
- Call Emergency Services: Dial 999 (UK) or your local emergency number immediately and request an ambulance.
- Tap or Shake the person: Gently tap or shake the person’s shoulder and shout loudly. Ask, “Are you alright?”
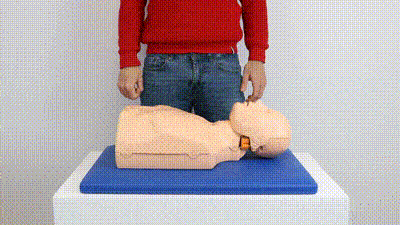
3. Unresponsive Adult (Open Airway & Check Breathing)
- Open the Airway: If unresponsive, use a head-tilt chin-lift manoeuvre (or jaw thrust if necessary) to open the airway.
- Check for Breathing: Look, listen, and feel for chest rise for no more than 10 seconds.
4. Not Breathing Normally (Begin CPR)
- Chest Compressions:
- Place the heel of your hand on the lower half of the sternum (breastbone).
- Interlock your fingers and keep your arms straight.
- Perform 30 high-quality chest compressions at a rate of 100-120 compressions per minute (BPM) for 15-18 seconds.
- Aim for at least 5 cm (2 inches) of compression depth with complete chest recoil after each compression.
- Use a metronome or mental counting (say “one and two and three…” at a rate of approximately two compressions per second) to maintain the correct rate.
5. Deliver Breaths (if using a barrier device)
- Pinch the nose shut.
- Create a seal with your mouth over the person’s mouth.
- Deliver 2 breaths, each lasting 1 second, observing visible chest rise.
6. Repeat CPR Cycles (Compressions & Breaths)
- Continue cycles of 30 chest compressions followed by 2 breaths.
- Aim for less than 10 seconds between cycles to minimise interruptions in compressions.
- Continue CPR until:
- The person starts breathing normally.
- An AED arrives.
- You become exhausted and unable to continue effectively.
7. AED Available (Follow AED Prompts)
- Power on the AED: Turn on the AED as soon as it arrives.
- Follow AED prompts: Attach the AED pads according to the manufacturer’s instructions.
- Clear the Patient: Say “Clear” and ensure everyone is clear of the patient when prompted by the AED for analysis and potential shock delivery.
- Follow instructions: If a shock is indicated, the AED will guide you through delivering the shock safely.
8. Resume CPR After AED
- Resume Compressions: After shock delivery (if applicable), say “Resume compressions” and instruct the instructor (or bystanders) to resume compressions immediately.
- Continue CPR: Continue cycles of chest compressions and breaths (if using a barrier device) following AED prompts until help arrives or the person starts breathing normally.
Adult CPR and AED Checklist [Download and Print]
Adult CPR and AED CHECKLIST
This checklist summarizes the essential steps of Adult CPR and AED use. Remember, this is a quick reference. Refer to your full training materials and instructor for detailed explanations and proper technique.
Before You Begin:
- Find a quiet, distraction-free environment.
- Set a metronome to 110 beats per minute (BPM) (you or the instructor can use it).
- Ensure the instructor can hear the metronome, manikin click (for compression depth), and your voice clearly. Adjust audio settings if needed.
1. Scene Safety – ALWAYS CHECK
Before approaching a person in distress, ensure the scene is safe for yourself and others.
2. Unresponsive Adult (Call for Help & Check Responsiveness)
- Call Emergency Services: Immediately dial 999 (UK) or your local emergency number and ask for an ambulance.
- Check Responsiveness: Tap or shake the person and shout loudly. Ask, “Are you alright?”
3. If Unresponsive (Open Airway & Check Breathing)
- Open the Airway: Tilt the head back with chin lift or use jaw thrust (if needed) to open the airway.
- Check for Breathing: Look, listen, and feel for chest rise for no more than 10 seconds.
4. Not Breathing Normally (Begin CPR)
- Chest Compressions:
- Place the heel of your hand on the lower half of the sternum (breastbone).
- Interlock your fingers and keep your arms straight.
- Perform 30 high-quality chest compressions at a rate of 100-120 compressions per minute (BPM) for 15-18 seconds.
- Aim for at least 2 inches of compression depth with complete chest recoil after each compression.
5. Deliver Breaths (if using a barrier device)
- Give 2 Breaths: Pinch the nose shut, create a seal with your mouth over the person’s mouth, and deliver 2 breaths, each lasting 1 second, observing visible chest rise.
6. Repeat CPR Cycles (Compressions & Breaths)
- Continue cycles of 30 chest compressions followed by 2 breaths until the AED arrives or the person starts breathing normally. Aim for less than 10 seconds between cycles.
7. AED Available (Follow AED Prompts)
- Power on the AED: Turn on the AED as soon as it arrives.
- Follow AED prompts: Attach the AED pads according to the manufacturer’s instructions.
- Clear the Patient: Say “Clear” and ensure everyone is clear of the patient when prompted by the AED for analysis and potential shock delivery.
- Follow instructions: If a shock is indicated, the AED will guide you through delivering the shock safely.
8. Resume CPR After AED
- Resume Compressions: After shock delivery (if applicable), say “Resume compressions” and instruct the instructor to resume compressions immediately.
- Continue CPR: Continue cycles of chest compressions and breaths (if using a barrier device) following AED prompts until help arrives or the person starts breathing normally.
Basic Life Support Checklist PDF [Free Download]
Remember:
- This is a guide. Act quickly and confidently in a real emergency.
- Practice CPR regularly to maintain proficiency.
- Call emergency services immediately, even if you are unsure if the person needs help.
Train others basic life skills [click link]: Book onto our Basic life support instruction course
Additional Considerations:
- Bleeding: If you encounter severe bleeding, apply direct pressure to the bleeding site with a clean cloth or clothing.
- Choking: If the person is choking and unable to cough or speak, perform the Heimlich manoeuvre (if trained).
Basic life support is an important skill that can save lives. By following these steps and practicing regularly, you can be prepared to act in an emergency.
Let us Help you
We’ll help you find the right course for your needs. Tell us a little bit about your situation and what you would like to achieve.
We’ll get back to you within one working day.